How to Paint Shabby Chic Kitchen Cabinets (Guide)
Learn how to paint shabby chic kitchen cabinets with prep, paint choice, thin coats, distressing methods, and a clear coat finish that lasts.
Preparing Cabinets for Painting
If you want shabby chic kitchen cabinet painting to look intentional, start with prep. The finish will fail fast if grease, dust, or old wax remains. Your goal is a clean, dull surface that paint can grip.
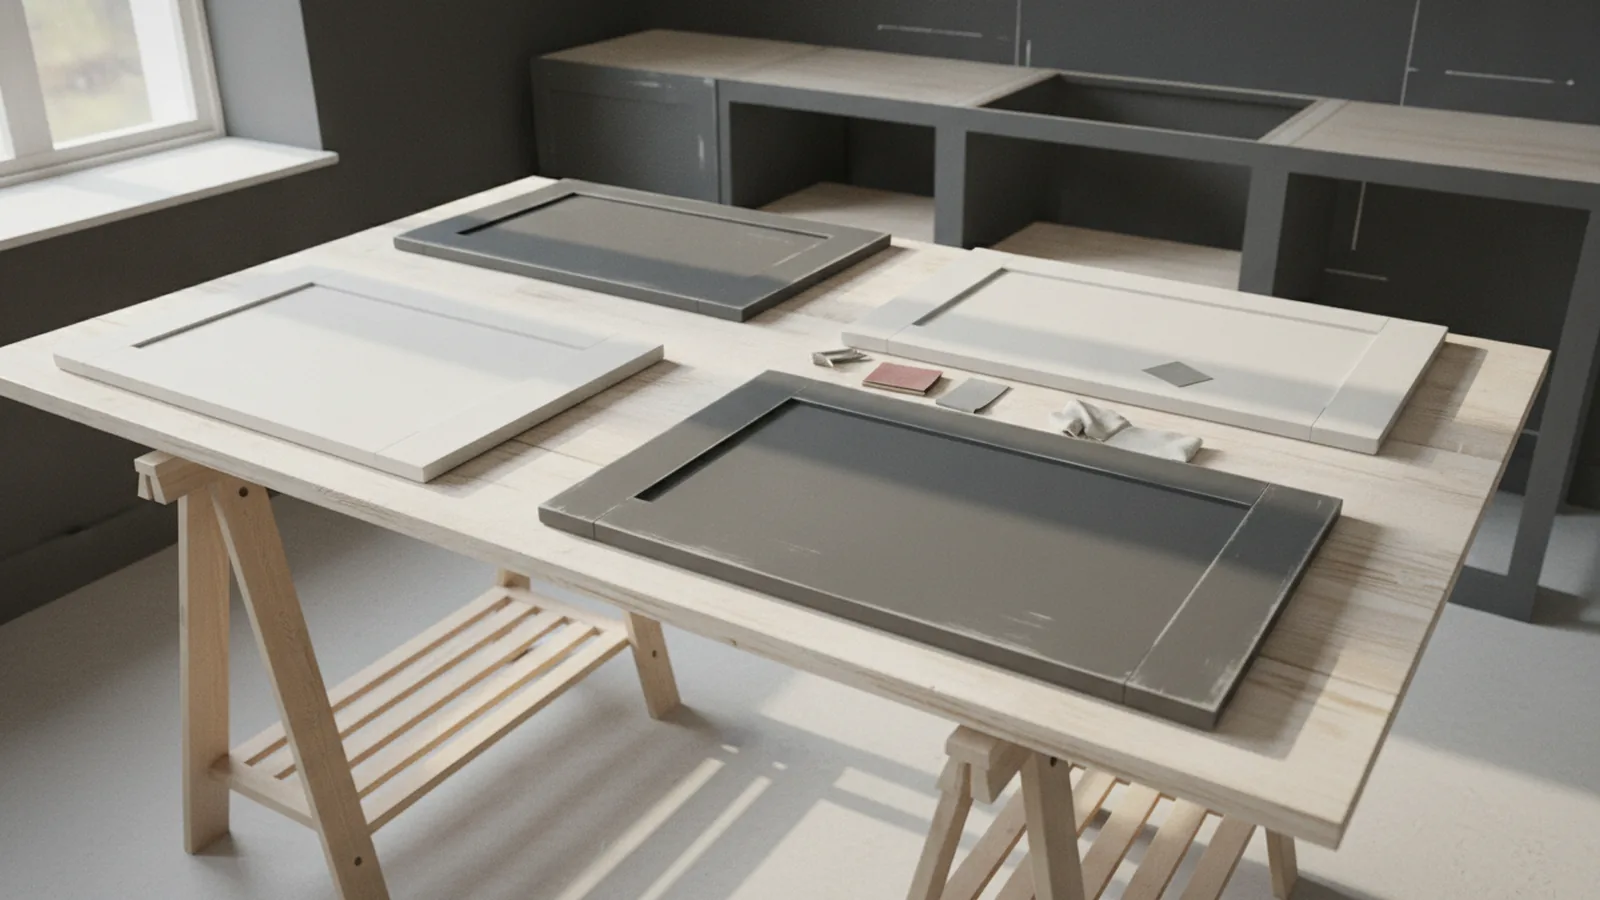
Remove cabinet doors, drawers, and all hardware. Label each piece with tape so reassembly stays painless. Lay parts on a work surface so you can coat edges and backs, too.
Clean thoroughly using a degreaser made for kitchens, then rinse if the label calls for it. For stubborn residue, wipe again with a fresh cloth and clean water. Next, scuff sand to dull the existing shine, even if the cabinets are already painted.
Finally, do a paint adhesion testing patch before you commit. Choose a hidden area, then brush or spray your base color and let it dry fully. Check for peeling or tacky spots after drying and light sanding.
- Degrease first to remove cooking oils and film.
- Remove doors and hardware for cleaner coverage.
- Sand to dull the finish for better grip.
- Do a small paint adhesion testing patch to confirm bond.

Choosing the Right Paint
For shabby chic cabinet styles, you want furniture paint that layers well and dries to a smooth surface. Look for a paint made for cabinets or trim, ideally one that sands without turning gummy. If you plan distressing, choose a paint that holds edges after sanding.
Most projects use a primer plus a topcoat system. If your cabinets are stained wood or have a slick finish, a bonding primer improves paint adhesion. When you skip primer, you risk chipping around knobs and drawer fronts.
Color choice matters when you plan distressed kitchen cabinets. A dark base coat application helps you get that layered look when you sand through. For example, use a deep charcoal or espresso undercoat, then cover with a pale cream or soft gray.
Also decide on sheen. For shabby chic kitchen cabinet painting, a satin or eggshell finish hides minor scuffs while still looking soft. High-gloss highlights every brush mark and sanding wave.
| Stage | What to pick | Why it matters |
|---|---|---|
| Primer | Bonding primer (if needed) | Builds grip for paint adhesion |
| Base coat | Dark color if you will distress | Creates the “through-layer” effect |
| Topcoat | Light shabby chic color | Gives the airy, aged look |
| Clear coat | Protective clear coat | Durability in daily kitchen use |

Step-by-Step Painting Process
Once prep is done, how to paint shabby chic kitchen cabinets becomes mostly about patience and thin coats. Rushing usually leads to drips, uneven sheen, or chips at the first wipe. Plan to paint in controlled layers and let each coat dry fully.
Start with primer if required. Apply a thin, even layer using a quality brush for edges and a foam roller or small roller for flat areas. Allow primer to cure as directed, then lightly sand with fine grit for a smooth base.
If you are using a dark base coat, apply it next. Keep strokes even and watch for thick spots on corners. Dry time can be longer in cooler rooms, so avoid touching until the surface feels firm.
For the topcoat, apply paint in thin, even coats. Aim for 2 to 3 coats depending on coverage, and let each coat dry completely. Between coats, scuff sand lightly to remove dust nibs and help the next layer bond.
- Prime (only if your surface needs it).
- Apply dark base coat application for distressing depth.
- Paint the topcoat in thin layers, 2–3 coats.
- Sand lightly between coats for a smooth paint finish.
- Let everything cure before distressing.
If you see brush marks, fix them by sanding after the final coat cures, not by adding thick paint. Use fine grit sanding paper and wipe dust off with a tack cloth. That step keeps the surface ready for distressing techniques.

Distressing Techniques
Distressing kitchen cabinet styles should look natural, not random. The worn areas usually follow real wear paths: corners, edges, raised panels, and spots near handles. Decide where you want age before you touch sandpaper.
One approach uses sanding. Let the topcoat cure, then sand with medium grit on edges you want to wear through. Switch to finer grit for smoothing so the exposed areas look blended rather than scraped.
Another method uses wax as a barrier. You apply a wax layer to areas you want to reveal later, then paint over it. When you distress, the wax-reduced areas sand or wipe away more easily, which helps control the “through” effect.
Either method works, but use restraint. Start with light passes, then step back and compare pieces under bright light. You can always distress more, but you cannot un-sand easily.
- Sanding: focus on corners, edges, and panel ridges.
- Wax barrier: apply wax only to targeted wear spots.
- Blend transitions using finer grit after initial wear.
- Work in small sections to keep control.
When you distress, you reveal the layered colors. A dark base coat application lets the underlayer show as a rich shadow. That contrast is what makes distressed kitchen cabinets feel dimensional instead of flat.
Sealing and Protecting the Finish
After distressing, seal the finish to survive daily kitchen use. Without sealing, the surface can scuff, absorb moisture, or wear faster than you expect. Choose a protective clear coat made for painted furniture and cabinets.
Before you seal, remove sanding dust carefully. Wipe with a clean microfiber cloth and, if needed, a gentle tack cloth. Let the surface dry and confirm it feels smooth with no gritty spots.
Apply the clear coat in thin layers. Use a foam brush for a smooth look, or spray for an ultra-even coat if you have experience. Follow the recoat times on the label to avoid soft layers that can drag.
Keep the finish curing time in mind. If the label says 7 days for full hardness, treat it seriously. Early use can imprint fingerprints or cause faint tack marks on soft finishes.
- Clean off dust before clear coat sealing.
- Apply thin clear coat layers for even protection.
- Allow full cure, not just dry-to-touch time.
- Reinstall hardware only after the finish hardens.
Tips for a Successful Project
Shabby chic cabinet work looks best when you treat it like a production line. Keep parts aligned, paint the same day, and avoid mixing fresh and partially cured pieces. This keeps color and sheen consistent across the whole kitchen.
Test your paint adhesion testing patch again if you change products. Even small differences in primer or topcoat can affect bonding. Also test your distressing level in a hidden corner so you can predict how fast the paint wears.
Handle temperature and airflow like part of the method. Paint dries slower in cold rooms, which can increase sagging on vertical doors. Aim for moderate room temperature and ventilation, and avoid painting right before humidity spikes.
Finally, plan your reassembly workflow. Install hinges and pulls after the clear coat cures. Tighten screws gently to avoid chipping the edges, especially on distressed areas.
- Keep coats consistent across every door.
- Do small tests for bonding and distressing depth.
- Control room temperature to reduce drips and bubbles.
- Reinstall hardware after full cure.
Frequently asked questions
- How do I prep kitchen cabinets before shabby chic painting?
- Start by degreasing the surfaces, then scuff sand to dull the shine. Remove doors and hardware so you can reach edges and panels easily. Finish with a small paint adhesion testing patch before full coats.
- What paint should I use for shabby chic kitchen cabinet painting?
- Use a furniture paint that sands smoothly and supports layering. Choose a satin or eggshell paint finish for a softer look that hides minor flaws. Add primer when your cabinets are stained or slick.
- Should I distress after the paint fully cures?
- Yes. Wait until the topcoat feels hard enough to sand without tearing. Then distress edges and corners gradually so the wear looks natural.
- What is the best way to distress kitchen cabinets—sanding or wax?
- Sanding gives direct control over where paint wears through. Wax as a barrier can make distressing easier in targeted spots. Either method works, but start lightly and build up.
- Do I need to seal distressed kitchen cabinets?
- You should seal with a protective clear coat sealing. This protects the paint from scuffs, moisture, and everyday cleaning. Apply thin layers and allow full cure time before use.
- How many coats do I need for the best result?
- Most projects need 2 to 3 topcoat layers for even coverage. Apply thin coats and scuff sand between coats to reduce dust bumps. Let each coat dry fully for a smooth surface.
Related reading
How to Say “Dining Room” in Spanish and When to Use It
“El comedor” means dining room in Spanish. Learn usage, related terms, and memory tips.
How to Divide a Room Into Two Bedrooms: Practical Methods
Split one room into two bedrooms with walls, curtains, or furniture—plus light and rental tips.
How to Decorate a Room With Slanted Ceilings for More Space
Color, lighting, smart furniture, and storage ideas for slanted ceilings.